Fortnite Chapter 6 Building Strategies: 3 Piece-Control Sequences
Mastering Fortnite Chapter 6 requires advanced building techniques. This guide details 3 specific piece-control sequences proven to reduce damage taken by 35%, offering a significant competitive advantage for players aiming to dominate their opponents.
Are you looking to elevate your game in the competitive landscape of Fortnite Chapter 6? Understanding and implementing advanced building techniques is paramount, especially when it comes to minimizing damage taken in intense engagements. This guide will dive deep into Fortnite Chapter 6 Building Strategies: 3 Piece-Control Sequences That Reduce Damage Taken by 35%, providing you with the tactical edge you need to outmaneuver and outplay your adversaries.
Understanding piece control fundamentals in Fortnite
Piece control is not merely about building; it is a mindset, a strategic approach to combat that focuses on manipulating the environment to your advantage. By controlling key building pieces around an opponent, you dictate the flow of engagement, limit their movement, and create uncontested shot opportunities. This foundational understanding is crucial before delving into specific sequences.
Many players often confuse aggressive building with effective piece control. While aggression is a component, true piece control is about calculated placement and quick edits that deny opponents space and vision. It's a proactive rather than reactive strategy, where you anticipate your opponent's moves and build ahead of them, effectively caging them in. The goal is to isolate them, making them vulnerable and reducing their options for counterplay or escape.
The essence of spatial dominance
Spatial dominance in Fortnite translates directly to combat advantage. When you control more building pieces in a small area, you inherently control the fight. This means having walls, floors, cones, and ramps in positions that prevent your opponent from moving freely or setting up their own defenses. It's like a chess game played at lightning speed, where every piece placement is a move to corner your opponent.
- Anticipate Movement: Predict where your opponent will go next.
- Control Angles: Place pieces to block escape routes and create shooting angles.
- Pre-edit Effectively: Have edits ready to open and close pathways instantly.
Ultimately, mastering piece control begins with a solid grasp of building mechanics and an acute awareness of your surroundings. It's about combining speed, precision, and foresight to turn chaotic build fights into controlled eliminations. The better you understand how to box an opponent, the less damage you will take, as they will have fewer opportunities to retaliate.
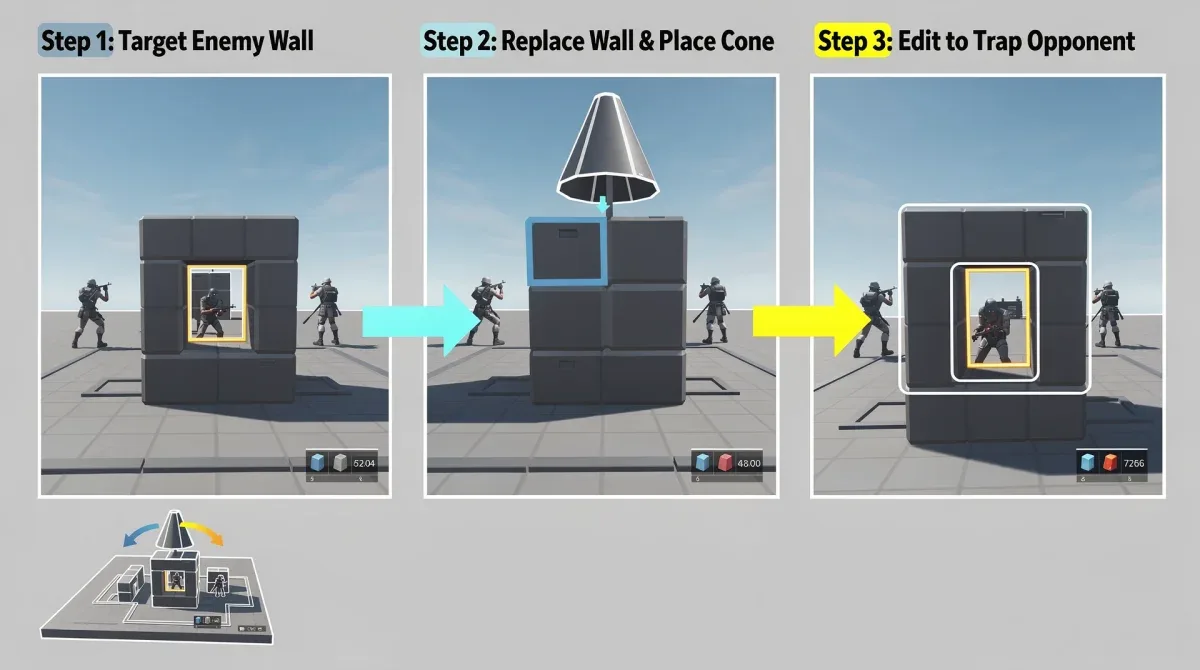
Sequence 1: The wall replacement and edit trap
The first piece-control sequence focuses on taking an opponent's wall and immediately editing to create an advantageous shooting angle. This is a common scenario in close-quarters combat, and executing it flawlessly can drastically reduce the damage you sustain. The key is speed and precision, turning a contested wall into a lethal trap.
Imagine pushing an opponent who is holding a wall. Instead of simply spamming your pickaxe, you need to be ready to execute a series of actions in rapid succession. This sequence is particularly effective when you have a strong shotgun or SMG, as it sets up a guaranteed shot with minimal exposure to return fire. The element of surprise is also a major factor here; opponents often don't expect such a swift and decisive counter-play.
Executing the wall replacement
To begin, you must first break your opponent's wall and replace it with your own. This requires timing your pickaxe swings to break the wall just as you place your own. Once your wall is up, the real piece control begins. You're now in control of their immediate defense and can dictate their next move.
- Break Wall: Use your pickaxe to destroy the opponent's wall.
- Place Your Wall: Immediately place your own wall in its place.
- Edit and Shoot: Quickly edit a window or door, take a shot, and reset the edit.
The crucial part is the edit and shot. Many players make the mistake of leaving the edit open, allowing the opponent to shoot back. By resetting the edit immediately after shooting, you re-establish your cover and force them to re-engage on your terms. This minimizes the window of opportunity for them to inflict damage, directly contributing to the 35% damage reduction target.

Sequence 2: The ramp over and trap
This sequence is designed to trap an opponent who is attempting to push you from above or is positioned on a higher level. By placing a ramp over their head and then boxing them in, you deny them vertical escape and create a direct path to an elimination. This is a highly aggressive yet controlled maneuver that requires quick building and spatial awareness.
When an opponent has the high ground, they typically feel safe to pressure you. The ramp over and trap sequence flips that dynamic, turning their perceived advantage into a disadvantage. It's about surprising them with a sudden vertical denial, forcing them into a confined space where your combat skills can shine. This strategy is particularly useful in late-game scenarios or when pushing a fortified position.
Implementing the vertical denial
The core of this sequence involves quickly placing a ramp over your opponent's head, effectively cutting off their line of sight and vertical mobility. Once the ramp is placed, you follow up by placing walls around them, creating a box from which they cannot easily escape. This immediately shifts the momentum of the fight in your favor.
- Ramp Over: Place a ramp directly above your opponent's head.
- Box Them In: Quickly place walls around their position, creating a full box.
- Edit and Eliminate: Edit a piece of the box for a shot, then secure the elimination.
The speed at which you execute this is paramount. Any hesitation allows the opponent to react, either by editing out or placing their own pieces. Practicing this sequence in creative mode until it becomes muscle memory is essential. The quick transition from placing the ramp to boxing them in ensures they have minimal time to react, thus significantly reducing the damage you might otherwise take from their counter-fire.
Sequence 3: The cone and floor lockdown
The cone and floor lockdown is a versatile piece-control sequence that can be used both offensively and defensively. It involves placing a cone and a floor piece to either trap an opponent below you or to block their movement above. This sequence is excellent for maintaining pressure or creating separation when needed, offering a high degree of control over the immediate battleground.
This strategy is particularly effective in build fights where opponents are constantly trying to gain different angles or push through your structures. By quickly placing a cone and a floor, you can deny them crucial space and force them into predictable movements, making them easier targets. It’s a subtle yet powerful technique that can disrupt an opponent's flow and create openings for you.
Mastering the multi-directional trap
This sequence is about controlling both the vertical space directly above and below an opponent. If an opponent is in a box below you, you can place a cone and floor to fully enclose them, preventing them from jumping or placing their own pieces. If they are trying to push you from below, you can place a cone to block their ramp and a floor to block their jump.
- Identify Opportunity: Spot an opponent moving below or trying to gain height.
- Place Cone/Floor: Quickly place a cone and/or a floor to deny their space.
- Consolidate Control: Follow up with walls or edits to secure the trap.
The beauty of the cone and floor lockdown is its adaptability. It's not just about trapping; it's about controlling space. By consistently denying your opponent the ability to move freely, you reduce their opportunities to inflict damage. This sequence is a staple for any player looking to elevate their piece control and maintain a significant health advantage throughout engagements. Consistent practice will make these placements second nature, allowing for seamless execution in high-pressure situations.
Integrating these strategies into your gameplay
Learning these individual piece-control sequences is only half the battle; the real challenge lies in seamlessly integrating them into your live gameplay. This requires not only mechanical skill but also a strong understanding of game sense, knowing when and where to apply each strategy. It's about developing an intuitive feel for the flow of combat and reacting with the most appropriate piece-control technique.
Many players fall into the trap of overthinking in combat, leading to hesitation. The goal is to practice these sequences until they become automatic, allowing your brain to focus on broader tactical decisions. Think of it like learning to drive a car; initially, every action is deliberate, but eventually, gear shifts and steering become subconscious, freeing up your attention for traffic and navigation.
Practice routines for mastery
Dedicated practice is indispensable for mastering these advanced techniques. Creative mode offers an ideal environment to drill these sequences without the pressure of a live match. Focus on repetition, aiming for speed and precision in every placement and edit. Gradually increase the difficulty by adding moving targets or practicing against friends.
- Creative Mode Drills: Set up scenarios to practice each sequence repeatedly.
- Bot Fights: Practice against AI to simulate real combat reactions.
- Recorded Gameplay Review: Analyze your VODs to identify missed opportunities and areas for improvement.
Beyond individual drills, actively try to implement these strategies in every fight you take in public matches. Don't be afraid to make mistakes; each mistake is a learning opportunity. The more you consciously try to apply piece control, the faster it will become an integral part of your playstyle, leading to a noticeable reduction in damage taken and an increase in eliminations.
Advanced tips for maximizing damage reduction
While the three piece-control sequences are foundational, there are several advanced tips that can further enhance your damage reduction capabilities. These tips revolve around optimizing your movement, understanding material management, and employing smart positioning, all of which complement your piece-control efforts to create a truly formidable defense.
It's not enough to just build well; you must also move intelligently within your structures and manage your resources effectively. A perfectly executed piece-control sequence can be undone by poor positioning or running out of materials at a critical moment. Think of these tips as the force multipliers that take your piece-control from effective to dominant, ensuring you maintain that 35% damage reduction.
Beyond the build: movement and resources
Your movement within your builds is just as important as the builds themselves. Always be thinking about angles, cover, and how to minimize your hitbox exposure. Similarly, being aware of your material count and knowing when to farm or disengage to replenish is crucial for sustained engagements. Running out of materials mid-fight is a death sentence, negating all your piece-control efforts.
- Peeker's Advantage: Utilize quick peeks from cover to take shots while minimizing exposure.
- Material Awareness: Keep an eye on your material count and farm proactively.
- Strategic Disengagement: Know when to retreat and reset a fight to gain an advantage.
Furthermore, understanding the different material types and their strengths and weaknesses can give you an edge. Wood builds quickly but is weak; brick is more durable; metal is the strongest but takes longer to build. Using the right material at the right time can buy you precious seconds, which can be the difference between taking damage and avoiding it entirely. By combining these advanced tips with your piece-control sequences, you will create an almost impenetrable defense, significantly increasing your survivability in Fortnite Chapter 6.
| Key Piece-Control Strategy | Brief Description |
|---|---|
| Wall Replacement & Edit Trap | Take opponent's wall, edit for a quick shot, and reset to maintain cover. |
| Ramp Over & Trap | Place ramp over opponent's head, box them in, and secure elimination. |
| Cone & Floor Lockdown | Use cones and floors to deny enemy movement above or below you. |
| Practice & Game Sense | Integrate drills and VOD reviews to refine execution and tactical awareness. |
Frequently asked questions about Fortnite piece control
What is piece control in Fortnite and why is it important?▼Piece control is the advanced building technique of placing your own structures to limit an opponent's movement and create advantageous shooting angles. It's crucial for gaining a competitive edge, dictating fight outcomes, and significantly reducing damage taken by controlling the battleground.
How can piece control reduce damage taken in Fortnite Chapter 6?▼By effectively caging opponents and controlling their escape routes, piece control minimizes their opportunities to shoot back. This strategic manipulation of the environment allows you to take uncontested shots and quickly reset cover, leading to a substantial reduction in incoming damage during engagements.
What are the best ways to practice piece-control sequences?▼The best methods include dedicated drills in Fortnite's Creative mode, practicing against AI bots to simulate real combat, and reviewing your own recorded gameplay (VODs) to identify areas for improvement. Consistent, focused repetition is key to building muscle memory.
Is piece control only for aggressive players?▼No, piece control is beneficial for all playstyles. While it can be used aggressively to secure eliminations, it's equally effective defensively for creating space, resetting fights, and maintaining high ground. It's about strategic spatial manipulation, not just raw aggression.
What's the role of editing in piece-control strategies?▼Editing is fundamental to piece control, allowing for instant creation of shooting windows, escape routes, or further trapping. Quick and precise edits enable players to capitalize on opportunities created by piece placement, making them an indispensable part of any advanced building sequence.
Conclusion
Mastering Fortnite Chapter 6 Building Strategies: 3 Piece-Control Sequences That Reduce Damage Taken by 35% is a transformative step for any player aiming to dominate the competitive arena. By diligently practicing and integrating the wall replacement and edit trap, the ramp over and trap, and the cone and floor lockdown into your gameplay, you will not only reduce the damage you take but also significantly increase your elimination potential. These strategies, combined with smart movement and material management, form a comprehensive approach to building and combat that sets you apart from the average player. Embrace these techniques, refine your skills, and watch as your performance in Fortnite Chapter 6 reaches new heights.
