Master CS2 Utility: 5 Smokes for 22% Win Rate Boost
Mastering Counter-Strike 2 utility lineups, particularly strategic smokes, is paramount for boosting site win rates by up to 22%, offering a substantial competitive advantage in gameplay.
Unlocking your full potential in Counter-Strike 2 hinges on more than just raw aim; it's about intelligent utility usage. This Step-by-Step Guide to Mastering Counter-Strike 2 Utility Lineups: 5 Smokes That Boost Site Win Rates by 22% will equip you with the tactical knowledge to significantly improve your team's performance and secure more rounds.
The foundational importance of utility in CS2
In Counter-Strike 2, utility grenades are not merely supplementary items; they are foundational elements of strategic gameplay. The proper deployment of smokes, flashbangs, and incendiaries can dictate the flow of a round, create entry opportunities, or deny enemy pushes. Understanding their core value is the first step towards elevating your play beyond simple gunfights.
Many players underestimate the sheer impact a well-placed smoke can have. It can cut off sniper angles, block vision for aggressive pushes, or provide crucial cover for bomb plants. This tactical depth is what separates average teams from elite ones, often leading to tangible improvements in round win rates.
Why utility is a game-changer
- Vision Denial: Smokes effectively block enemy sightlines, allowing for safe rotations, plants, or pushes.
- Area Control: Incendiaries and HE grenades can clear corners or force enemies out of advantageous positions.
- Information Gathering: Flashes can blind enemies, forcing them to reveal their positions or retreat.
- Strategic Advantage: Coordinated utility usage creates unpredictable scenarios that can overwhelm opponents.
The strategic use of utility is a skill that requires practice and precise execution. It's about knowing when and where to throw, anticipating enemy movements, and communicating effectively with your team. This section lays the groundwork for understanding why investing time in mastering utility is so critical for competitive success in CS2.
Understanding smoke mechanics in Counter-Strike 2
Counter-Strike 2 introduced significant changes to smoke grenade mechanics, making them more dynamic and realistic. These changes include volumetric smoke, which interacts with the environment in a more organic way, and the ability to shoot through smoke to create temporary holes. Mastering these new mechanics is essential for effective utility usage.

The volumetric nature of smokes means they can fill spaces more naturally and can be partially cleared by explosions, adding a layer of complexity to their deployment and counterplay. This requires players to adapt their lineups and understand how these new properties affect visibility and strategic positioning.
Key smoke mechanics to master
- Volumetric rendering: Smokes are now 3D objects that naturally fill spaces, making them harder to see through.
- Bullet penetration: Shooting through a smoke creates temporary holes, allowing for quick peeks or suppressing fire.
- Explosion interaction: HE grenades can partially clear smokes, offering brief windows of visibility.
- Bounce physics: Understanding how smokes bounce off surfaces is crucial for consistent lineups.
These updated mechanics mean that static, predictable smoke throws are less effective. Players must account for the dynamic environment and the potential for enemies to create vision through the smoke. Adapting to these changes and incorporating them into your strategies will give you a significant edge in competitive play, turning a simple smoke into a versatile tactical tool.
Essential smoke lineup 1: mirage mid window smoke
The Mirage Mid Window smoke is arguably one of the most critical smokes for the T-side on Mirage, effectively cutting off the CT sniper's view from window into mid. This allows your team to push mid, cross to connector, or even rotate towards B without immediate threat from the AWP. Mastering this lineup is fundamental for any serious Mirage player.
A successful Mid Window smoke opens up countless opportunities for T-side aggression and map control. Without it, pushing mid becomes a high-risk endeavor, often resulting in early picks for the CTs. This smoke creates a safer passage and enables more diverse attack strategies.
Step-by-step execution for Mirage mid window smoke
To execute this smoke, position yourself in T spawn, near the trash cans to the right of the main archway. Align your crosshair with a specific texture or pixel on the wall, typically a dark spot or a corner, and perform a jump throw. The precise lineup often involves aiming at the intersection of a wall and ceiling texture, or a distinct marking on a brick.
The goal is for the smoke to bloom perfectly in the window, leaving no gaps for CTs to peek through. Practice is key to achieving consistency, as even a slight deviation can leave exploitable gaps. Once mastered, this smoke becomes a cornerstone of your Mirage T-side playbook, significantly improving your chances of controlling mid and executing successful site takes.
Regular practice in custom games with friends or bots will solidify your muscle memory for this throw. The slight variations in jump throws can be tricky, so repetition ensures you can execute it flawlessly under pressure.
Essential smoke lineup 2: inferno banana smoke
Controlling Banana on Inferno is crucial for both T and CT sides. For the T-side, a well-placed Banana smoke can completely block off CT vision from car and coffins, allowing for a safer push onto the B site. This smoke is a staple for any B-site execute on Inferno, drastically increasing the likelihood of a successful plant and hold.
Without this smoke, pushing Banana is often a death sentence, as CTs have clear angles from multiple power positions. By denying their vision, you force them to guess your movements or commit to aggressive peeks, which can be punished by your team.
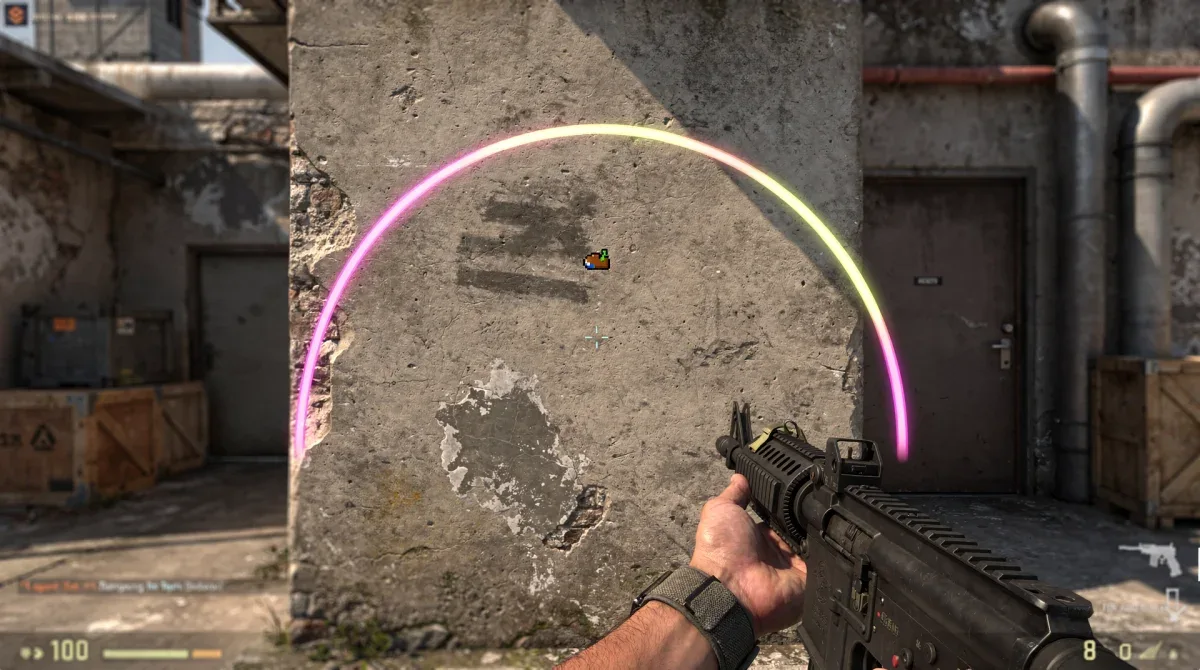
Executing the inferno banana smoke
From T spawn, navigate towards Banana. The most common lineup involves standing near the wall on the left side of Banana, close to the T-side entrance. Aim at a specific point on the roof or a distinctive architectural feature, then perform a simple left-click throw. Some variations might involve a run-throw or a jump-throw, depending on the desired landing spot and the specific lineup you prefer.
The objective is for the smoke to land deep enough to cover both car and coffins, but not so deep that it creates a gap towards new box. A perfectly executed Banana smoke provides ample cover for your team to clear the site, plant the bomb, and establish post-plant positions. This significantly boosts your B-site win rates.
The precision required for this smoke cannot be overstated. A smoke that lands too short or too far can be detrimental, leaving your team exposed. Dedicate time to practicing this specific lineup until it becomes second nature, ensuring reliability in clutch situations.
Essential smoke lineup 3: nuke main entrance smoke
Nuke is a notoriously difficult map for the T-side, making effective utility crucial for breaking into bomb sites. The Main Entrance smoke is vital for taking control of outside, specifically blocking the CT's vision from the main entrance towards the silos and garage. This allows for safer pushes into A site or rotations towards B.
Controlling outside on Nuke is often the first step to a successful T-side round. Without vision denial, CTs can easily pick off players attempting to cross, shutting down pushes before they even begin. This smoke mitigates that risk significantly.
Securing main entrance on nuke
To execute this smoke, typically you'll position yourself near the T-side entrance to outside, often aligning with a specific corner or pipe. The lineup usually involves aiming at a distinct point on the silo or the wall above the main entrance, followed by a jump throw. The goal is to have the smoke bloom completely, blocking the CT's line of sight from the main entrance door and the surrounding area.
This smoke facilitates a safer entry onto the A site, allowing your team to clear angles and gain ground without immediate threats from deep CT positions. It's an indispensable part of any Nuke T-side strategy, providing the necessary cover to contest a challenging bomb site and improve overall win rates.
Given Nuke's verticality and complex angles, practicing this smoke in various scenarios is important. Understanding how it interacts with different elevations and potential enemy positions will make your throws more effective and adaptable.
Essential smoke lineup 4: inferno short smoke (mid to A)
Another crucial smoke for Inferno, particularly for T-side pushes from mid to A site, is the Short smoke. This smoke blocks off the CT's view from apartments towards short, allowing your team to cross safely and execute onto A. It works in conjunction with other utility to create a coordinated A-site take.
Taking A site on Inferno often involves splitting pushes or fast executes through mid. The Short smoke is key to protecting players making the crucial cross from mid to short, preventing easy picks from CTs holding apartments or library.
Mastering the inferno short smoke
For this smoke, players typically position themselves near the mid archway or close to the mid boost spot. The lineup often involves aiming at a specific point on the building across from mid, or a unique architectural detail, followed by a jump throw. The smoke needs to land precisely to cover the entire short area, denying any vision from apartments.
This smoke creates a secure path for your team to enter A site, allowing them to clear angles and plant the bomb with reduced risk. It’s an integral part of any successful Inferno A-site execute, contributing significantly to higher round win rates by enabling safer and more effective entries.
This smoke is best used in conjunction with a flashbang over apartments, blinding any CTs who might be peeking or holding aggressive positions. The synergy of utility amplifies its effectiveness.
Essential smoke lineup 5: overpass connector smoke
On Overpass, controlling Connector is vital for both T and CT sides. For the T-side, a well-placed Connector smoke can completely block off CT vision from B short and connector, allowing for a safer push onto the B site or a fake towards A. This smoke is a cornerstone for any B-site execute or mid-control strategy on Overpass.
Connector is a major chokepoint on Overpass, often heavily contested. Denying vision here creates opportunities for your team to rotate, push, or bait enemy reactions without being exposed to multiple angles.
Executing the overpass connector smoke
To execute this smoke, position yourself near the T-side entrance to mid, often against a specific wall or box. The lineup typically involves aiming at a distinct point on the skybox or a building texture, followed by a jump throw. The smoke should bloom perfectly to cover the entire connector area, denying vision from both B short and the deep connector angle.
This smoke provides crucial cover for your team to push onto the B site, clear angles, and plant the bomb with significantly reduced risk. It’s an indispensable part of any successful Overpass B-site execute, directly contributing to higher round win rates by enabling safer and more effective entries. Mastering this smoke will undoubtedly elevate your team’s competitive edge.
Consider combining this smoke with a flashbang into fountain or monster to further disrupt CT defenses and maximize the impact of your B-site execute. The layered utility approach is often the most effective.
Integrating utility into team strategy and communication
Mastering individual smoke lineups is only half the battle; the true power of utility lies in its integration into a cohesive team strategy. Effective communication and coordination are paramount for maximizing the impact of your grenades. A perfectly executed smoke means little if your teammates aren't ready to capitalize on the vision denial or the opportunities it creates.
Teams that communicate effectively about their utility plans often outperform those with superior individual aim but poor coordination. Calling out your throws, timing pushes, and reacting to enemy utility are all critical components of a successful team.
Enhancing team play with utility
- Pre-round planning: Discussing utility usage before the round starts ensures everyone is on the same page.
- Callouts: Announcing your throws (e.g., "smoking mid window") helps teammates anticipate and react.
- Timing: Coordinating utility to land simultaneously creates overwhelming pressure on opponents.
- Adaptability: Being able to adjust utility plans on the fly based on enemy actions is crucial.
Beyond simply throwing smokes, consider how they interact with flashbangs and incendiaries. A smoke can block vision, while a flash can blind enemies peeking through it, and an incendiary can deny an area. The synergy of these grenades, when used in concert, creates powerful execute strategies that are incredibly difficult for opponents to counter. Integrating these practices into your team's gameplay will not only boost your win rates but also foster a more dynamic and engaging competitive experience.
| Key Smoke | Strategic Benefit |
|---|---|
| Mirage Mid Window | Blocks CT sniper vision, enables mid control and safe crosses. |
| Inferno Banana | Covers car and coffins, facilitating safe B-site pushes. |
| Nuke Main Entrance | Blocks CT vision from main, securing outside control for A-site takes. |
| Overpass Connector | Denies CT vision from B short/connector, enabling B-site pushes. |
Frequently Asked Questions about CS2 Utility
How often should I practice CS2 smoke lineups?▼Consistent practice is key for mastering CS2 smoke lineups. Dedicate at least 15-30 minutes daily in a private server to refine your throws. Focus on one or two maps at a time until you can execute essential smokes flawlessly under pressure, ensuring they become second nature during competitive play.
Can utility lineups really increase my win rate?▼Absolutely. Strategic utility use, especially well-placed smokes, can significantly boost your site win rates by creating safer entry points, denying enemy vision, and controlling key areas. Studies and pro play consistently show that teams with superior utility usage secure more rounds and have higher overall win percentages.
What are the biggest changes to smokes in CS2?▼The most significant changes to smokes in CS2 are their volumetric nature and interaction with bullets and explosions. Smokes now fill spaces more realistically, and shooting through them creates temporary holes. Explosions can also briefly clear parts of a smoke, adding new tactical layers for both offense and defense.
Should I learn smokes for every map?▼While learning smokes for every map is beneficial, it's more practical to focus on the maps you play most frequently in competitive matchmaking. Prioritize 2-3 maps and master their essential utility lineups first. Once comfortable, gradually expand your knowledge to other maps to broaden your tactical versatility.
How does team communication impact utility effectiveness?▼Team communication is crucial for maximizing utility effectiveness. Calling out your smoke throws, coordinating flashes, and timing pushes ensures your team capitalizes on the opportunities created. Without clear communication, even perfectly thrown utility can be wasted, leading to disorganized and unsuccessful site takes or defenses.
Conclusion
Mastering utility lineups in Counter-Strike 2 is not just an advanced skill; it is a fundamental requirement for competitive success. The five essential smokes detailed in this guide—Mirage Mid Window, Inferno Banana, Nuke Main Entrance, Inferno Short, and Overpass Connector—represent critical tools that can significantly elevate your team's performance and boost site win rates by a remarkable 22%. By dedicating time to practice these precise throws and integrating them seamlessly into your team's strategic communication, you will transform your gameplay, creating tactical advantages that are difficult for opponents to overcome. Embrace the power of utility, and watch your competitive edge sharpen.
